To convert HEIC to JPG on a Mac, open the photo in Preview, choose File > Export, pick JPEG and save. For many photos at once, select them in Finder, right-click and use Quick Actions > Convert Image, or drop them into a browser converter that hands back a ZIP.
iPhones save photos as HEIC to save space, and once they reach your Mac through AirDrop or Photos, they stay HEIC. Your Mac reads them fine, but a job portal, a Windows colleague or an older website often won't. Here are five free ways to turn them into JPG, and when each one is the right pick.
1. Preview: one photo or a handful
- Double-click the HEIC file so it opens in Preview.
- Choose File > Export.
- Set Format to JPEG and move the Quality slider to about three quarters.
- Click Save.
For several photos, select them all in Finder and open them together in Preview. In the sidebar, select every thumbnail with Command-A, then choose File > Export Selected Images, click Options, pick JPEG and choose a folder. Preview keeps the original files untouched.
2. Finder Quick Action: batch convert in two clicks
On macOS Monterey and later, Finder has a built-in converter. Select the HEIC files, right-click, choose Quick Actions > Convert Image, set the format to JPEG, pick an image size and click Convert to JPEG. The JPGs appear next to the originals. This is the fastest way to convert a folder of photos without opening any app.
3. Photos: export from your library
If the pictures live in the Photos app, select them and choose File > Export > Export [n] Photos. Set Photo Kind to JPEG, choose quality and size, then click Export. Avoid Export Unmodified Original, which gives you the HEIC files back. Photos also applies any edits you made, which Preview and Finder can't see.
4. Terminal: sips for scripts
macOS includes sips, a command-line image tool. In the folder with your photos, run sips -s format jpeg photo.heic --out photo.jpg for one file. For a whole folder, mkdir jpg && for f in .heic; do sips -s format jpeg "$f" --out "jpg/${f%.}.jpg"; done converts everything into a jpg subfolder. It's handy for automations and Shortcuts.
5. In the browser: batch convert to a ZIP
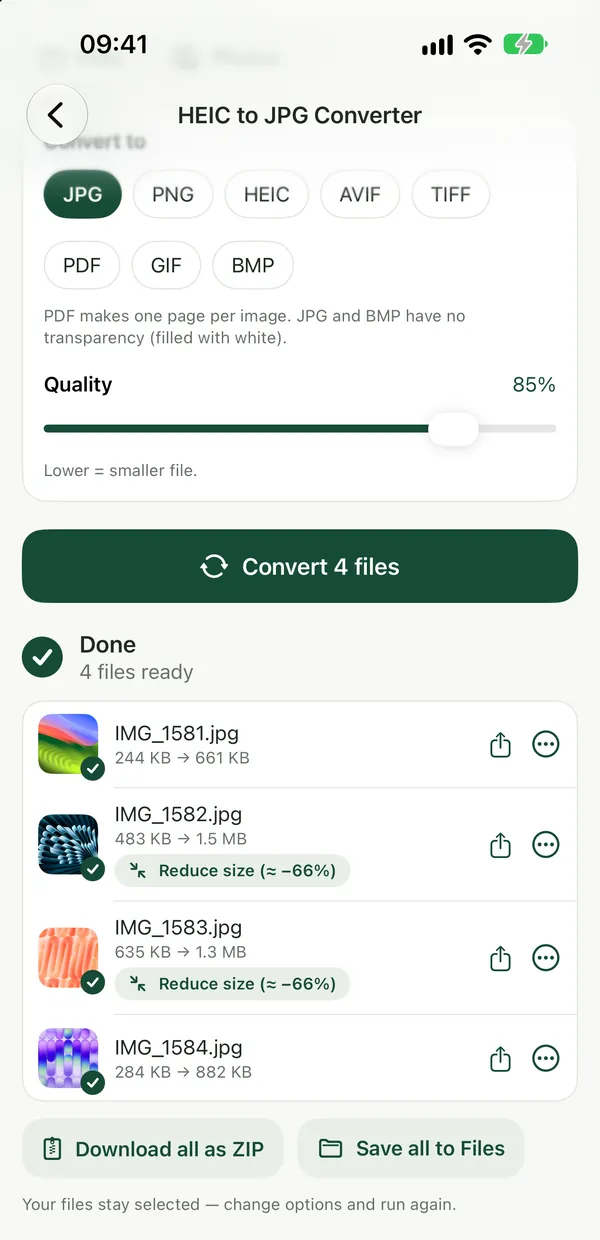
HEIC to JPG ConverterConvert iPhone HEIC photos to JPG right in your browser. Files never leave your device.Open tool- Open HEIC to JPG in Safari or Chrome.
- Drag in one HEIC photo or a whole selection from Finder.
- Pick the quality, then click Convert.
- Download the JPGs one by one or all at once as a ZIP.
The conversion runs in your browser, so private photos aren't uploaded anywhere. This route works the same on a work Mac where you can't change settings, on a Windows PC or on a Chromebook. To convert to PNG, WebP or AVIF instead, use the Image Converter.
Which method should you use?
- One or two photos: Preview.
- A folder of photos on a recent Mac: the Finder Quick Action.
- Edited photos in your library: Photos export.
- Repeated or scheduled jobs:
sipsin Terminal. - A big batch you want as one ZIP, or a Mac you can't customise: the browser tool.
When to keep HEIC
JPG is the safe format for sharing, but HEIC is better for storage: it's about half the size at the same quality and keeps Live Photo and depth data. Convert copies for whoever needs JPG and keep the originals. To stop your iPhone creating HEIC in the first place, see our guide to HEIC to JPG for iPhone photos, which explains the Most Compatible camera setting.
Frequently asked questions
Does converting HEIC to JPG lose quality?
A little, because JPG is a lossy format and the image is compressed again. At high quality settings the difference isn't visible in normal viewing. Convert once from the original HEIC rather than re-saving JPGs repeatedly, which adds a small loss every time.
Why are my converted JPG files bigger than the HEIC files?
HEIC compresses roughly twice as efficiently as JPG, so the same photo at the same quality takes more space as JPG. Lowering the quality slider to about 75 to 80 percent usually brings sizes down without visible changes for sharing or uploading.
Is the photo location and date kept after conversion?
Preview, Photos and sips usually keep the main metadata such as the date and camera. Photos lets you remove location in its export options. If you're sharing photos publicly, check the location setting before exporting, because GPS coordinates can travel with the JPG.
Can I convert HEIC to JPG on a Mac without installing anything?
Yes. Preview, Photos, the Finder Quick Action and the sips command are all built into macOS, and the browser converter runs in Safari. None of these need a download, an account or an App Store purchase to turn HEIC photos into JPG.